Sensor Alerts
You can have BMON send you a text message, email, or a Pushover notification (explained later) if important sensor conditions occur, such as Alarm conditions or too low/high of temperatures. To configure Alerts, you first must log into the Admin interface, as explained in Add Buildings and Sensors. Once into the Admin interface, there are two main tasks–adding Alert Recipients (people that receive alert notifications), and adding the actual Sensor Alert Conditions. These tasks are described in the sections below.
Adding Alert Recipients
An Alert Recipient is a person who will receive a notification when an
Alert occurs. When the actual Alert Condition is set up, you will choose
which Alert Recipients are notified for that Alert. From the Home screen
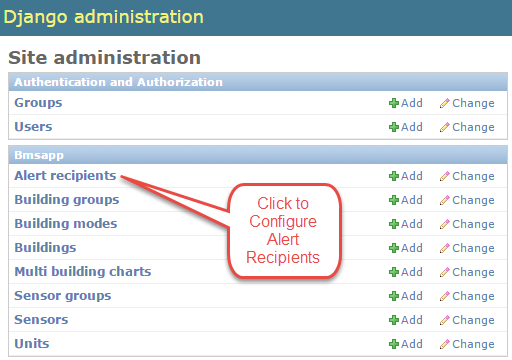
of the Admin interface, click the Alert recipients link shown below to add an Alert
Recipient or change information for an existing recipient:
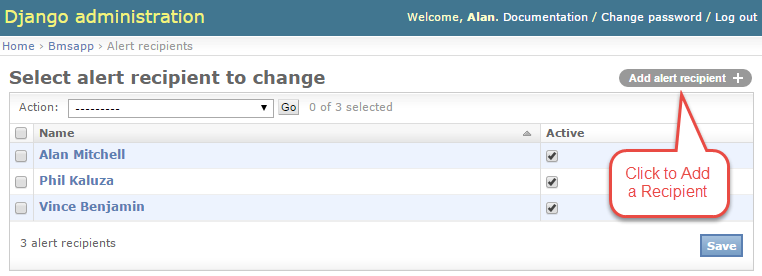
Then on the next screen, click on Add alert recipient as shown below to add a recipient:
The following screenshot shows the inputs used to describe an Alert Recipient:
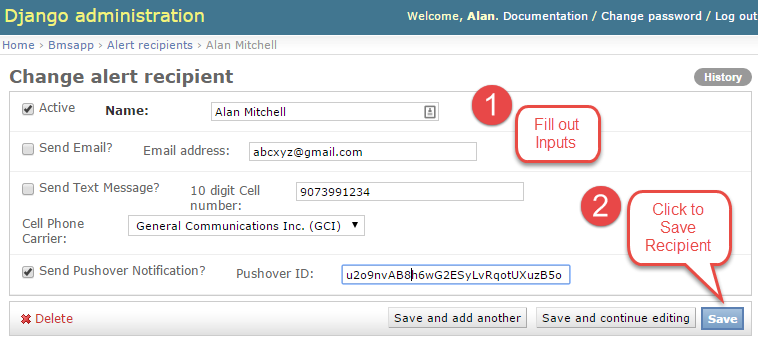
Enter a Name for the Alert Recipient and make sure the Active
checkbox is checked (you can uncheck the Active box to temporarily
disable sending messages to this recipient).
There are three different ways a Recipient can be notified: Email, cell phone text message, and a Pushover notification. Pushover is a special notification application that you can install on your smart phone for a one-time $5 charge. Benefits of the application are discussed later.
One or more of these notification methods can be enabled for a
Recipient. The screenshot above shows the checkboxes for each method
(Send Email?, Send Text Message?, and
Send Pushover Notification?). Simply check the boxes for the methods
you would like to use. If multiple boxes are checked, the Recipient will
be notified by all of the enabled methods.
Each notification method has some associated inputs; there is no need to fill out inputs for notification methods that are not used. The inputs are for the most part self explanatory. Do note that when you enter a cell phone number for the text message method, enter all 10 digits and do not use any dashes or spaces in the number. Select the cell phone carrier from the dropdown box; if a carrier is not available in the list, please contact the developer to have it added.
The Pushover notification service has some advantages relative to Email and Text:
Messages from BMON will not be mixed in with your normal Email and Text messages.
You can set up Quiet Hours in Pushover so that normal priority notifications will be quieted during those hours.
BMON allows you to assign priorities to notifications. Pushover can treat those priorities differently, producing more noticeable alert sounds for higher priorities.
Adding Alert Conditions
You add an Alert Condition to a specific sensor in the BMON system. So,
you first need to access the screen that allows you to edit information
about the particular Sensor. To do this, return the Home screen by
clicking the Home link in the upper left corner of whatever Admin
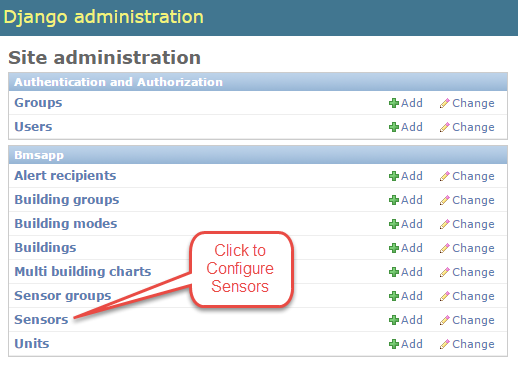
screen you are currently on. Next, click the Sensors link in the
left column as shown below:
Next, you need to find the Sensor that you want to configure an Alert condition for. Remember that you can Filter sensors by Building by using the Filter box at the right hand side of the screen. Once you locate the Sensor, click it to bring up its Edit screen.
The Alert Conditions section is at the bottom of the Sensor edit screen, as shown in the screenshot below:
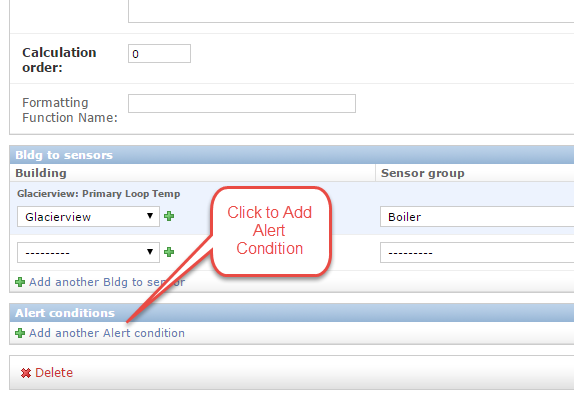
After clicking the link to Add another Alert condition, you are taken
to the Alert conditions page as seen below, to allow for configuration of the Alert.
In the screenshot below, the inputs have already been filled in but will be described
next:
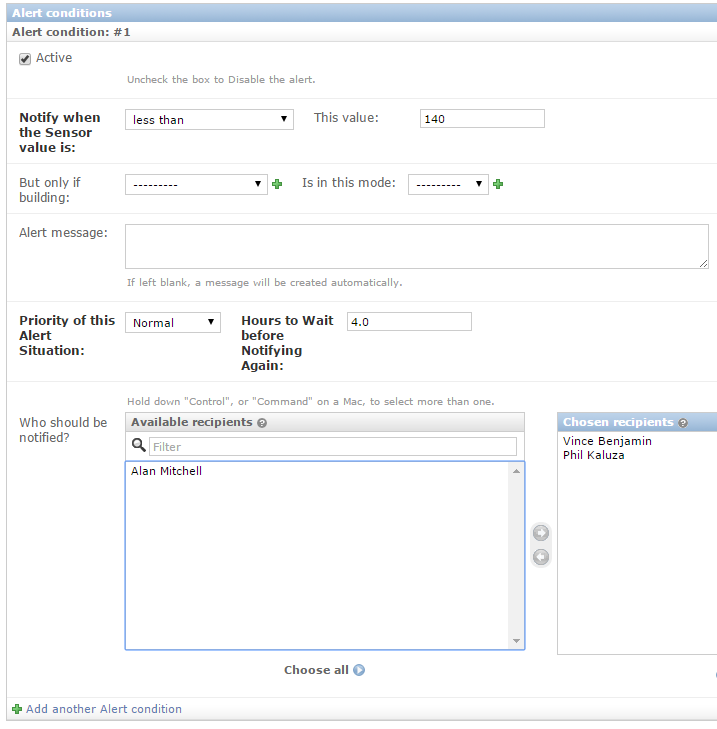
This alert is being set up to notify someone if the Boiler Supply
temperature drops below 140 degrees F. The first thing to ensure is that
the Active checkbox is checked; it can be unchecked if you want to
temporarily disable this Alert.
Next, choose the correct comparison to make in the
Notify when the Sensor value is dropdown. In this case, we chose the
less than comparison because we want to know when the sensor drops
below or is less than a certain value. The This value: input lets us
set the trigger value, which in this case is 140 deg F.
We will discuss the next two inputs related to Building mode later. In this example they are not used and are left with no selections.
BMON will automatically create a relevant Alert message, or you can
type your own message in the Alert message box. We have left the
message blank in this example and will use the one created by BMON.
You can select a priority for this Alert in the
Priority of this Alert Situation dropdown. For text messages and
Emails, this has little effect other than affecting the text in the
Subject line of the message. For Pushover notifications, the priority
setting will affect the alert tones, selecting Emergency will
force the User to acknowledge the Alert or the Alert will continue to
repeat every 5 minutes.
BMON checks for Alert conditions every 5 minutes. However, you may not
want to receive a notification every 5 minutes for the same Alert. the
Hours to Wait before Notifying Again input allows you to specify how
long BMON should wait before notifying you again about the same Alert
Condition. In this example we have accepted the default value of 4
hours, so if this Alert Condition is still present 4 hours after the
first Alert notification is sent, BMON will send out another
notification.
The final section allows you to select the Alert Recipients who will
receive notifications for this Alert. Double-clicking a name in the left
Available recipients box will move the name into the
Chosen recipients box. The arrow icons between the two boxes can
also be used to select and unselect recipients.
Finally, click the Save button in the lower right corner to Save the
Alert setup and any other changes you may have made to this Sensor.
There is no limit to the number of Alert Conditions that you can create
for one sensor. Before clicking the Save button, we could have added
another Alert Condition for this Boiler Supply temperature sensor by
having clicked the Add another Alert condition link at the bottom of
the screen. Or after Saving the first condition, we can go back to the
Sensor edit screen and add another condition. It is common to want an
Alert if a sensor has too low of a value and also want an Alert if the
sensor value is too high. For the Boiler Supply temperature example, you
could also set up a second Emergency priority Alert if the temperature
drops below 120 deg F.
Note
Alerts can be created for calculated fields as well as normal sensor readings. Since a calculated field can combine the values of multiple different sensors (see Mathematical Calculated Fields), complex alert conditions can be created that include tests for multiple different sensor values. For example, a calculated field can be created that will evaluate to True if a particular flow rate is zero at the same time that outdoor temperature is less than 38 degrees. An Alert can then be set on that field to notify recipients when this condition occurs.
Inactive Alerts
You may want to know when a sensor is failing to post new readings. You
can set up a special “Inactive” Alert for this purpose. The
Notify when the Sensor value is input contains a number of choices,
including less than, greater than, etc. The last choice in the
dropdown is inactive. Selecting this choice will create an Alert
that will notify recipients if the sensor has not posted a reading
during the last two hours (or the value for the
BMSAPP_SENSOR_INACTIVITY setting in the BMON Settings
File. If inactive is chosen,
the trigger value input is ignored.
Alerts Affected by Building Mode
Sometimes, Alert conditions only matter during certain seasons of the year or when a facility is in a particular operating mode. A particular circulation pump may need to be On for the entire Winter, but need not be On during the Summer. You can add a “Building Mode” check to your Alert Condition by filling out the two Alert Condition inputs shown below:

For our Boiler Supply temperature example, the above settings would
cause the Alert to be issued only if the Glacierview building is
in Winter mode. To set the particular operating mode of a building,
you need to manually go to the Edit screen for the Building and set the
Current Operating Mode input. There is no provision in BMON for
automatic determination of the building operating mode.
BMON comes pre-configured with the Winter and Summer operating
mode choices. On the main Admin screen you will find a link to
Building Modes where you can add and delete Building Operating Modes
so they fit your needs.