Setting Up Sensors to Post to BMON
This document gives specific instructions on how to set up a couple different types of sensors to post their data to BMON system. In addition, general documentation is given to allow other types of sensors to post to BMON if they have Internet access ability and the ability to use the HTTP protocol to export data.
Specific instructions are provided for:
The Mini-Monitor, a Raspberry Pi data acquisition system designed for the Alaska Housing Finance Corporation (AHFC) Building Monitoring project.
Kors HTTP Poster for Niagara AX, a software module that allows building control systems utilizing the Niagara AX software framework to export data via HTTP Internet transactions.
Monnit Wireless Sensors
Monnit wireless sensors transfer their collected data to the iMonnit Internet site, where the data can viewed and the configuration of the sensor can be changed. Fortunately, the iMonnit software has a feature that allows the wireless sensor data to be sent to a separate Internet site, such as a BMON web site. To configure this feature for use with BMON, log in to the iMonnit system and perform the following steps to navigate to the page that allows you to configure a “Webhook”:
On the home page after log in, click the cog icon in the upper right to access a drop-down menu. Select “API/Webhook” on that menu.
A horizontal top menu bar is present on the resulting page. Click “Webhook”.
On the next page, click the “Configure Webhook” button near the top right corner.
You are then presented with the form shown here:
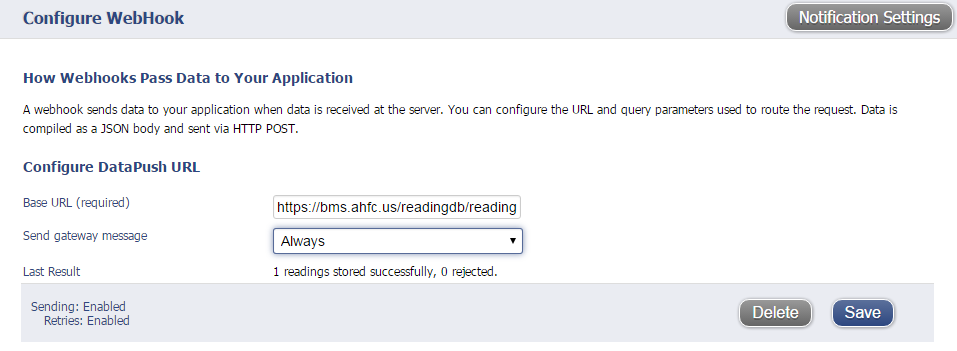
On this screen, only one input needs to the entered, the
Base URL (required) input. Here is a specific example of the input:
https://bms.ahfc.us/readingdb/reading/store/?format=monnit&storeKey=123xYz
and here is the general form:
[Base URL of BMON site]/readingdb/reading/store/?format=monnit&storeKey=[Store Key]
The two parameters that are specific to your BMON site are the
Base URL of the BMON site and the Store Key associated with your
BMON site (found in the settings.py file). Configuring this Webhook for
the iMonnit site will cause all subsequent sensor readings to be sent
to the BMON site and stored there. No configuration at the sensor level
is required.
You need to substitute the web URL for your BMON site in the
[URL of BMON site] placeholder, and you need to substitute your
Store Key in the [store key] placeholder. When you installed BMON
on the web server, you created
and entered the Store Key as the BMSAPP_STORE_KEY setting in the
BMON Settings File.
After Saving the dialog box, sensor data should be forwarded to the BMON
site after it arrives at the iMonnit site. On the previous configuration
dialog, there is a Last Result field that shows the result from the
last sensor post to BMON. It should say
X readings stored successfully, O rejected if the process is
working. If not, an error message will appear in this field.
In the BMON system, each Monnit wireless sensor will appear with a BMON Sensor ID that is the same as the Monnit sensor ID; for example the Monnit Sensor with ID 139883 will appear in the BMON system with a Sensor ID of 139883.
Mini-Monitor
The Mini-Monitor data acquisition system based on the Raspberry Pi computer was developed for the AHFC Building Monitoring project. It directly posts data to the BMON system. As described in the Mini-Monitor Documentation, there are two critical entries for data posting in the Mini-Monitor settings file:
POST_URL = '[URL of BMON site]/readingdb/reading/store/'
POST_STORE_KEY = '[store key]'
[URL of BMON site] and [store key] have the same meaning as they
did for the Monnit Wireless sensors. More information on setting up the
Mini-Monitor is provided in its documentation.
Kors HTTP Poster for Niagara AX
If you have a building DDC control system that utilizes the Niagara AX
software platform (e.g. the Tridium Jace system), you can add a $100
software module from Kors Engineering that will allow you to post point
values to the BMON system. Documentation that comes with the Kors Poster
module will assist in its install and configuration. You should use the
PeriodicTrackerExtension for the Kors Poster, and the two key inputs
in that extension are the Url, which should be:
[URL of BMON site]/readingdb/reading/[Sensor ID]/store/
[URL of BMON site] has the same meaning as before. For the
[Sensor ID] placeholder, you need to create a unique Sensor ID for
this DDC point. This will become the Sensor ID for this point in the
BMON system. The second important input is Format, which should be
entered as:
storeKey=[store key]&val=%newValue.value%
The [store key] placeholder has the same meaning as before.
The Kors Poster does not send any time information when it posts the point values. BMON will timestamp the readings when they arrive at the BMON system.
General Method for Gathering Data from Building Automation Systems
Most Building Automation/DDC Systems (BAS) can be configured to periodically create a file containing trend data for selected sensors and control points on the system. This file can then be used as a source of data to post to the BMON system. This section gives a general outline of how to set up a process for accomplishing this.
The general steps necessary are:
Install the file-sharing software Dropbox on the PC running the Building Automation System Management Software, or install it on a file server accessible to the Automation System. Create a folder in the Dropbox account that will hold the trend files created by the BAS.
Configure the Management Software for the Building Automation System to periodically create a trend file containing data from the sensors and control points of interest. Often, a useful time interval between recorded points is 10 to 15 minutes. Also, configure the software to create the trend file at least once daily, although for fresher data in BMON, creating the file every 4 hours is better. The best format for the trend files is Comma-Separated-Values (CSV). Configure the BAS to store these files in the Dropbox folder created in the prior step.
Install Dropbox on the BMON Server. Here are Instructions for a “headless” install of Dropbox on a Linux server. For the server, you can use the same Dropbox account as you set up in Step 1 or you can create a new Dropbox account associated with the BMON server; if you use a different account, Share the Dropbox folder you are using for the trend files with the Dropbox account used in the BMON server. After completion of this step, the BAS trend files will be readily accessible to the BMON server.
Finally, a script needs to be run on the BMON server to load the sensor data from the trend files into BMON. The csv-transfer utility is one such script that can continually monitor the Dropbox folder for new or changed files, and then load data present in those files into BMON. See the above linked documentation for that script. This script can actually reside on any PC or server that has access to the trend files and access to the Internet, including the BAS Management PC. The advantage of putting it on a cloud server running Dropbox is that it can be shared across multiple BAS systems and the owner of the BAS system does not need to install and configure the script; they have the simpler task of installing and configuring Dropbox.
This procedure has been implemented for a Siemens building automation system running the
Insight APOGEE management software. This document explains how to create
trend files on this system.
The csv-transfer configuration file for posting the data from these files to
BMON is shown below:
csv_files:
  - file_glob: "/home/amitchell2/Dropbox/cchrc_siemens/*.csv"
    file_type: siemens
    chunk_size: 10
    ts_tz: US/Alaska

consumers:
  - type: bmon
    poster_id:  an-bmon-01              # unique ID for this posting object
    bmon_store_url: https://bmon.analysisnorth.com/readingdb/reading/store/
    bmon_store_key: xyz1234567
Please note that an oftentimes better alternative to csv-transfer
is available: file-to-bmon. This utility
can load sensor readings from a set of files into BMON. There is more detail in the
section below.
General Utility for Loading Sensor Data from Files
The file-to-bmon project provides a script that can be used to load sensor reading data from a set of files. The script is structured so that custom file Reader modules can be written in Python to parse any type of text file containing sensor readings. The required code in the Reader module is focused exclusively on parsing sensor reading data from file, so the complexity of the code is relatively low.
This script is often used to process data that is periodically uploaded to a server, such as 15-minute electric utility data or data from a conventional datalogger such as the Campbell Scientific datalogger.
Please look at the documentation at the above link for more information.
Particle WiFi and Cellular Microcontroller Boards
Particle makes microcontroller boards with built-in WiFi or Cellular data connectivity. Firmware on the board manages communication with a Particle Internet server that provides a simple and robust Application Programming Interface (API) for sending and receiving data from the board. These boards make it relatively simple to implement custom data collection systems that are able to post data to BMON. This section describes how a configure a Particle board to deliver data to a BMON server.
The essential steps involve:
Creating a Webhook in your Particle account that forwards data from events to the BMON server.
Writing code for the Particle board that publishes an event with data in the correct format for consumption by the BMON server.
Create a Webhook on the Particle Server
Assuming you are logged into your Particle account, select the
CONSOLEitem from the right side of the top menu bar.From the resulting page, select the
Integrationsicon at the bottom of the left sidebar menu.Click the large plus sign to create a
NEW INTEGRATION, and then chooseWebhookfor the type of Integration.
The top part of the resulting form should look like the following, except the following includes sample inputs:
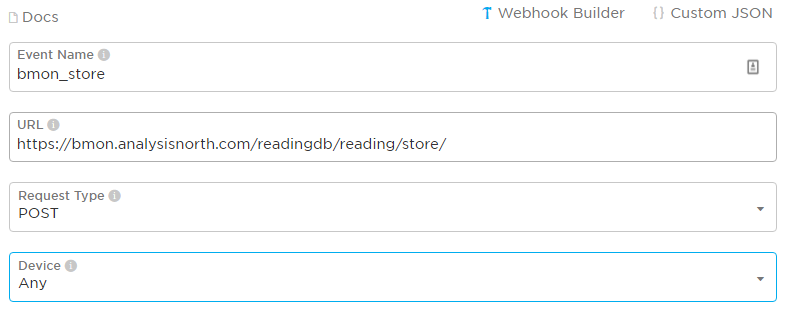
For the Event Name input, create a name for the event that will be
published by your Particle board. In this sample, the event name was
called bmon_store.
In the URL input box, enter a URL with the format:
[Base URL of BMON site]/readingdb/reading/store/
In the sample shown, the Base URL of BMON site is
https://bmon.analysisnorth.com.
Next, expand the Advanced Settings portion of the form to reveal the
following inputs:
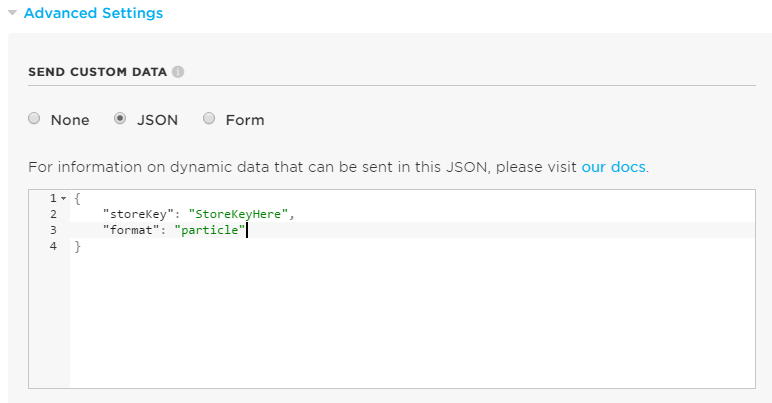
As shown in the above screenshot, select the JSON option in the
Send Custom Data section. Then, enter a JSON object with two keys.
As the value of the storeKey, enter the BMON store key inside the
quotes (from your BMON Settings File). As the value of the format
key, enter the word particle inside the quotes. Leave other inputs
at their defaults and click the Create Webhook button at the bottom
of the page to complete creation of the Webhook. Whenever a
bmon_store event (in this example) is received by the Particle
server, its data will be be forwarded to the BMON server.
Particle Event Format
The Particle server is now prepared to forward data to the BMON server.
However, the Particle board must publish an event of the proper name in
order for this transfer to occur. Given the example above where we set
the Event Name to bmon_store, here is an example of a Publish
statement coded on a Particle board that will send two sensor values to
the BMON server:
Particle.publish("bmon_store", "Ttank=103.4 Tdhw=98.4", 60, PRIVATE);
The sensor names and values appear in the second parameter. The sensor
name and the sensor value are separated by an equal sign, with no
embedded spaces. The different sensors are separated by spaces. These
two sensor readings will show up at the BMON server with the following
two Sensor IDs, assuming the ID number of the Particle board is
260034000c47343432313031:
260034000c47343432313031_Ttank
260034000c47343432313031_Tdhw
The sensor readings will be timestamped with the time they were received
by the Particle server. If you want the readings to be timestamped at
some offset prior to the time they were published, you can cause that to
occur by special formatting in the publish statement. Here is an
example:
Particle.publish("bmon_store", "Ttank=103.4a Tdhw=98.4 a=300")
In this example, the timestamp for the Ttank reading will be 300
seconds prior to the publish time, because an a is appended to the
Ttank reading. Since no a is appended to Tdhw, its timestamp
will be the publish time with no adjustment. The a=300 part of the
message is where the adjustment in seconds is set. The adjustment should
be an integer value in seconds.
This feature is particularly useful when the Particle board is averaging a number of readings over a set interval, and the average value is being published. The most accurate point in time to associate the average value with is the middle of the averaging interval, not the time when the value is published. If the averaging interval is 10 minutes (600 seconds), moving the timestamp back 300 seconds from the publish time is desirable and can be accomplished using the feature described above.
General Instructions for Posting Data from Other Systems
If your sensors are not one of the above types, you may still be able to use the BMON system if your sensor system can make HTTP requests containing the sensor data. There are currently two methods for storing sensor data into the BMON system. The first method stores one sensor reading. The second method allows you to store multiple sensor readings from one or more sensors. Below are descriptions of those two methods.
Storing One Sensor Reading
To store one sensor reading, you can make either a GET or a POST HTTP request. The URL that the request should be made to is:
[URL of BMON site]/readingdb/reading/[Sensor ID]/store/
Substitute the URL of the BMON site for [URL of BMON site], and
substitute the unique BMON Sensor ID for this sensor for the
[Sensor ID] placeholder. Here is a valid URL:
https://bms.ahfc.us/readingdb/reading/gview_dhw_temp/store/
In this example, the BMON site URL is https://bms.ahfc.us, and the
BMON Sensor ID for for this sensor is gview_dhw_temp; in order to
see this data in the BMON system, you need to have a Sensor
configured with the gview_dhw_temp
Sensor ID. If sensor data is posted to the BMON system prior to
configuring the Sensor, it will still be stored and will be visible once
the Sensor is configured in BMON.
Next, you need to add a query string containing additional data about this sensor reading. The query string should be formatted like:
storeKey=[store key]&val=[sensor value]&ts=[date/time of reading]
The [store key] has been discussed before and is the
BMSAPP_STORE_KEY setting you created in the BMON Settings File.
[sensor value] is the sensor’s reading value that is being posted to
the BMON database; it needs to be a number. [date/time of reading]
is the time of the sensor reading expressed in
Coordinated Universal Time (UTC).
The date/time should be entered as a string value, such as
Dec 3, 2014 10:03:45 PM, and it must be properly
URL encoded. The
prior date string, encoded properly, would be transmitted as:
Dec+3%2C+2014+10%3A03%3A45+PM. The format of the date/time string is
very flexible as the Python dateutil
parser
is used. All of the following strings are valid and parse to the same
date/time.
December 3, 2014 10:03:45 PM
Dec 3, 2014 10:03:45 PM
12/3/2014 22:03:45
Finally, inclusion of the ts query parameter just discussed is
optional. If it is not included, BMON will timestamp the sensor reading
at the time it arrives at the BMON system.
Here is a valid GET request that posts a gview_dhw_temp temperature
reading of 125.3 occurring at Dec 3, 2014 10:03:45 PM UTC:
https://bms.ahfc.us/readingdb/reading/gview_dhw_temp/store/?storeKey=123abc&val=125.3&ts=Dec+3%2C+2014+10%3A03%3A45+PM
The same request can be made with the POST method by sending a POST request to this URL:
https://bms.ahfc.us/readingdb/reading/gview_dhw_temp/store/
and including this query string in the message body of the POST request:
storeKey=123abc&val=125.3&ts=Dec+3%2C+2014+10%3A03%3A45+PM
The response from a successful HTTP request will be
1 readings stored successfully. If unsuccessful, an error message
will be returned.
Storing Multiple Sensor Readings
It is possible to post multiple sensor readings to BMON from one or more sensors. To do so, an HTTP POST request must be made. The URL to send the request to is:
'[URL of BMON site]/readingdb/reading/store/'
where [URL of BMON site] is filled in with your BMON URL, e.g.
https://bms.ahfc.us. The message body of the POST request should be
a JSON string following
the pattern of this example:
{"storeKey": "123abc",
 "readings": [
    [1432327040, "28.FFFA1C031400", 71.788],
    [1432327042, "test_cpu_temp", 45.527],
    [1432327040, "28.FF1A2D021400", 65.859]
    ]
}
The JSON object has two name/value pairs. The first name is the
storeKey, and the associated value must contain the
BMSAPP_STORE_KEY setting you created in the BMON Settings File. The
next name is readings, the value of which is an array of sensor
readings that you would like to store in BMON. Each element of that
array is in turn a 3-element array representing one reading. In the
example above, the first sensor reading is:
[1432327040, "28.FFFA1C031400", 71.788]
The 1432327040 element is the UTC timestamp of the sensor reading,
expressed as a Unix timestamp (number
of seconds since January 1, 1970). If you send a timestamp with
fractional seconds, BMON will truncate to an integer value. If the
timestamp is the JSON value null, the current time will be used for
the timestamp. The "28.FFFA1C031400" element is the unique BMON
Sensor ID surrounded in double-quotes. The 71.788 is the actual
sensor reading and must be a number. There can be as many sensor
readings (each a 3-element array) as you need.
If the Post was entirely successful, you receive a response like:
3 readings stored successfully
which tells you how many readings were successfully stored. If any errors occurred while storing readings, error messages separated by newline characters are appended to the above success phrase. If no readings were stored successfully, the response will be “0 readings stored successfully” plus an error message for each unsuccessful reading.