Periodic Scripts
There are a number of tasks that are useful to run on a periodic basis, such as:
Acquiring a batch of new sensor readings or data to store in BMON from a piece of equipment or server connected to the Internet.
Creating and sending a report on a periodic basis.
Sending data from the BMON database to a different database.
Performing a maintenance task.
The Periodic Script feature of BMON can be used for this purpose. There are currently a number of Periodic Scripts available in BMON:
a script to collect temperatures and other data from Ecobee thermostats,
a script to collect data from a Modbus TCP device accessible on the Internet,
a script to collect data from a Sensaphone IMS-4000 monitoring device,
a script to collect data from an Okofen wood pellet boiler,
a script to collect data from a Solar PV system using Enphase microinverters,
a script to send data to an InfluxDB database.
Those Scripts are discussed later in this document.
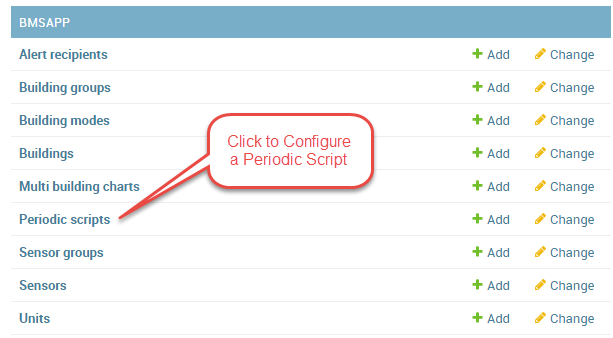
To set up a periodic script, go to the Home screen in the BMON Admin interface and select “Periodic Scripts”:
On the next screen, click the “ADD PERIODIC SCRIPT +” button in the upper right corner of the screen. Below are the inputs required to configure a Periodic Script, with example values:
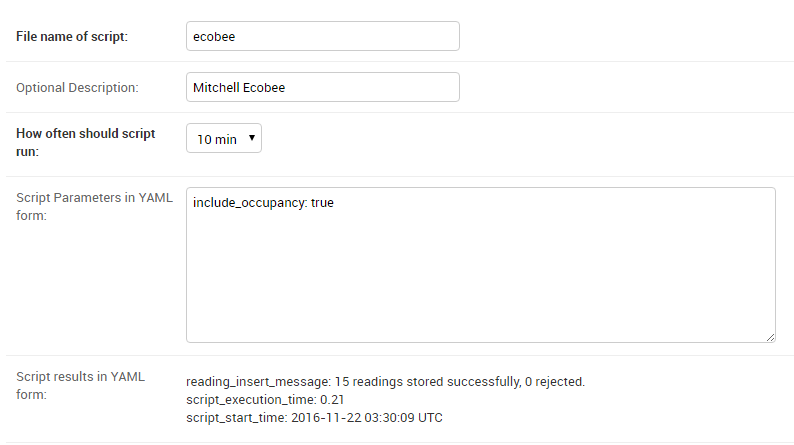
Each of these inputs is described below:
File name of scriptThe name of the file containing the Periodic Script is entered here. Each of the Periodic Scripts is contained in a separate Python file. Enter the name of that file here, but leave off the “.py” file extension. In this example, the script is contained in Python file named
ecobee.py. This is a script that retrieves temperature, humidity, occupancy and other data from an Ecobee thermostat. For the Periodic Scripts that are already available in BMON, the proper name to fill in here will be provided in the specific documentation for the script.Optional DescriptionIn this optional field, you can add comments to document the purpose of the script. For this example, the field is used to indicate that the script is retrieving data from the Ecobee thermostat at the Mitchell home.
How often should script runChoose a time interval indicating how often the script should run. Intervals range from every 5 minutes to every 24 hours. You can also select
Disabledto stop the script from running at all.Script Parameters in YAML formEach script may allow the System Administrator to set additional configuration parameters through use of script parameters. In the example here, an
include_occupancyparameter is given with the value oftrue. Multiple parameters can be entered on separate lines in the box, using YAML notation. The valid script parameters are documented for the specific script being run.Script results in YAML formThis is not a User input but instead displays results generated by the script the last time it was executed. For all scripts, the
script_start_timeis provided, indicating when the script last ran.script_execution_timeshows how long in seconds it took for the script to run. If the script is one that inserts new sensor readings into BMON, thereading_insert_messagewill indicate how many readings were successfully inserted. The developer of the script can return any number of values to be displayed here. Also, if errors occur running the script, they will display here.
After configuring the Script, click the “SAVE” button in the lower right corner of the screen to finalize your script. You can return to this screen to examine the most current Script Results produced by the script.
The rest of this document is used to discuss the currently available Periodic Scripts in BMON. If you are a Developer and want to develop custom Periodic Scripts, see the Periodic Scripts document for additional information.
Collect Data from Ecobee Thermostats
The ecobee Periodic Script collects sensor data from a set of
Ecobee Thermostats belonging to one Ecobee
account. The script is capable of collecting the following sensor data:
Actual Temperature at the main Thermostat
Desired Heating Temperature (the heating “setpoint” temperature)
Relative Humidity at the main Thermostat
Occupancy Status at the main Thermostat (reads “Occupied” if there was motion detected in the last half hour)
The fraction of time that the Thermostat was calling for heat during each 5 minute interval
The Actual Temperatures at any remote sensors associated with the thermostat
The Occupancy status at any remote sensors associated with the thermostat
The script collects and stores this data in the BMON sensor reading database for display through the normal BMON application.
Ecobee Authorization Process
Before BMON is allowed to pull data from an Ecobee account, two things must happen:
An API Key must be obtained by an Ecobee-registered developer. This key must be entered into the BMON Settings File as the
BMSAPP_ECOBEE_API_KEYsettings entry. This is a one-time procedure done by the BMON System Administrator, not the owner of the Ecobee account.For each Ecobee account where data extraction is desired, the owner of the account must authorize and add the BMON application to their Ecobee account. To do this:
Navigate to the “ecobee-auth” web page in the BMON application. For example, here is the URL to the page for BMON on the Alaska Housing Finance server: https://bms.ahfc.us/ecobee-auth/ . Substitute the correct base URL for your server.
The page will generate a 4-character PIN that needs to be entered into the Ecobee account. Follow the explicit instructions on the
ecobee-authBMON page to complete the process. Here is an example of theecobee-authpage that generates the 4-character PIN: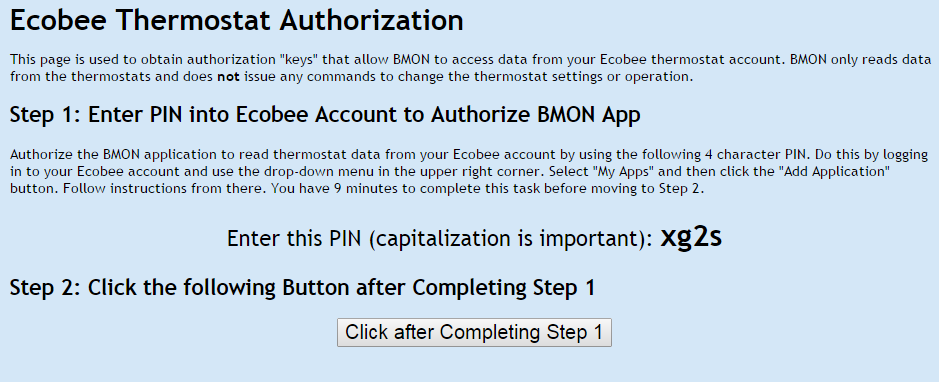
After clicking the button for Step 2, a new page appears with a box containing two important token strings:
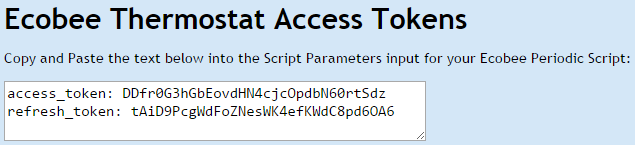
Use your mouse to select and then copy the
access_tokenandrefresh_tokentext in the box. Paste this text into the “Script Parameters in YAML form” input box for the Periodic Script you are setting up. Here is an example of how the inputs should look for the Periodic Script: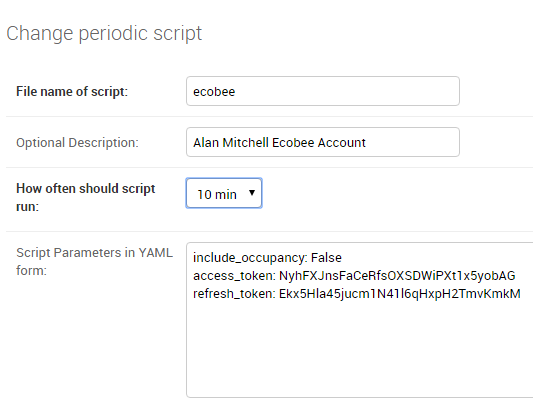
The script above will collect data from all of the thermostats in the Ecobee Account that went through the authorization process. Currently, there is no limit on the number of thermostats that can be added to one Ecobee account. If you wish to collect data from other Ecobee accounts, you need to set up a separate Periodic Script for each account. Each account will have to go through the authorization process described above, and separate tokens will be created for each account.
The initial authorization tokens that were acquired through the above
process will expire. BMON knows how to acquire fresh tokens and will do
so without any intervention by a user. Because the initial tokens
acquired above are quickly invalid, BMON deletes those tokens out of the
“Script Parameters” input box. If you re-open the Periodic Script
configuration screen, you will see that the access_token and
refresh_token entries are gone. This is not cause for alarm, as BMON
internally has the new tokens stored.
If the Account owner removes the BMON Application from the Ecobee
account, or if some other authorization problem occurs, you will have to
use the ecobee-auth page again to acquire new tokens. Enter the new
tokens into the “Script Parameters” input box to restore BMON’s access
to the Ecobee account.
Other Notes on Ecobee Configuration
Here are some additional notes on configuring Ecobee Periodic Scripts.
For the File name of script input, the value must be ecobee. A
good use for the Optional Description input is to put the name of
the Ecobee Account that is accessed by the script. For the
How often should script run input, the best value is “10 min”,
because the Ecobee API server returns data from three sequential
5-minute intervals, totalling 15 minutes of data. Polling the server
every 10 minutes ensures that the server will be polled at least once
during every 15-minute interval.
For the Script Parameters in YAML form input, there is currently
only one possible parameter other than the initial access_token and
refresh_token parameters that are entered during the authorization
process described above. That one parameter is:
include_occupancyPossible values are
TrueorFalse. If the parameter is set toTrue, the script will collect occupancy values reported by the occupancy sensor in in the main thermostat and the occupancy values reported by any remote thermostats. For Ecobee3 Lite thermostats, no occupancy sensors are present, so no occupancy values can be collected, irrespective of theinclude_occupancyparameter value.
After the Ecobee Periodic Script is properly configured and saved, collection of Ecobee data will begin. Successfully collected sensor readings will be stored in the BMON sensor reading database. However, these readings will not be displayed in the BMON graphing and report interface until each individual sensor is configured in the BMON system. See the Adding Sensors section for the process of adding a sensor into the BMON system. This process assigns an understandable name to the sensor, puts the sensor in an appropriate Sensor Group, and assigns the sensor to one or more buildings.
When adding a sensor to the BMON system, the sensor’s ID must be entered
into the Sensor ID, or Calculated Field ID input. For each of the
sensor readings collected by the Ecobee script, a Sensor ID is created.
The table below shows an example of the Sensor ID’s that are created by
the script. This table is based on an Ecobee Thermostat serial number of
311015614158 and a Remote Sensor code (found on the back of the
remote sensor) of CK2W. Your actual Sensor IDs will be based on your
Thermostat Serial Number and your Remote Sensor Codes.
Sensor ID |
Reading Type |
|---|---|
311015614158_temp |
Actual Temperature at Main Thermostat, deg F |
311015614158_heat_setpoint |
Desired Temperature (heating setpoint), deg F |
311015614158_heat1_run |
Fraction of the time that the thermostat called for heat during the 5 minute interval |
311015614158_rh |
Relative Humidity measured at the main thermostat, % |
311015614158_occup |
Occupancy at main thermostat. 1 if motion was sensed during the last half hour, 0 if no motion. |
311015614158_CK2W_temp |
Actual Temperature at the remote sensor, deg F |
311015614158_CK2W_occup |
Occupancy at remote sensor. 1 if motion was sensed during the last half hour, 0 if no motion. |
The occupancy readings are only included if include_occupancy is set
to True in the Script Parameters. The Remote Sensor values are repeated
for every remote sensor associated with the thermostat. Remote Sensors
are not supported by the Ecobee3 Lite thermostat.
Collect Data from Devices with a MODBUS TCP Inteface
A BMON Periodic Script is available to collect data from devices that have a MODBUS TCP interface, such as many Programmable Logic Controllers (PLC). The periodic script can collect multiple holding register values from one MODBUS device.
Note
If you have upgraded from an older installation of BMON, you
will need to install the modbus-tk==0.5.7 Python library to use this
periodic script.
Below is a screenshot shot showing example inputs for one MODBUS Periodic Script:

The File name of script entry must be modbus in order to invoke the MODBUS
periodic script. The Optional Description and How often should script
run entries have been previously described in this document. The rest of this
section will describe the Script Parameters in YAML form entry.
site_id(required)The
site_idis used to create a BMON Sensor ID for each of the holding registers collected by the script. Thesite_idis used as the first part of the Sensor ID; the latter part of the Sensor ID is the sensor name, which is entered for each holding register collected. The sensor name entry is described in more detail below.host(required)This is the IP Address or the host name of the target MODBUS device.
device_id(optional, defaults to 1)Some MODBUS devices are composites of several MODBUS devices; for example, a number of devices behind a MODBUS gateway. This this case, the
device_ididentifies which device is the target of the MODBUS command.holding_registers(required)As can be seen in the example, this parameter is entered as a YAML list; each item in the list describes one holding register that will be read and stored under one Sensor ID in BMON. Each holding register is described on one line and is in turn a YAML list of either three or four items. Four examples will be described here.
The first holding register example is:
- [550, 2084, heat_rate]
The line must start with a dash - and there must be a spaced between the
dash and the bracketed list items. The items in this exmaple are
- [port, MODBUS address, sensor name]. The port (550 in this example) is the
TCP/IP port at the Host which is used to access the MODBUS device. The MODBUS address
(2084 in this example) is the MODBUS address of the holding register to read.
It can be a number from 0 through 9998. The sensor name is the appended to the
site_id, described earlier, to make a BMON Sensor ID. The site_id and
sensor_name are separated by an underscore to make the Sensor ID. In this example,
the final Sensor ID would be abc_heat_heat_rate, since the site_id is abc_heat.
The second holding register example is:
- [550, [2087, 2086], total_heat]
The only thing different about this example is that a list of MODBUS addresses are given. When this is done, the values from the specified holding registers are combined into one number. The value from each register is considered to be a 16-bit digit in the final number; the most-signicant holding register is specified first in the list. In this example, assume that register 2087 contained the number 7 and that register 2086 contained the value 14345. The final value stored in BMON would be:
7 * 65536 + 14345
which equals:  473,097
The value 65536 is 2 raised to the 16 power.
The third holding register example also involves a list of MODBUS addresses, but a type identifier is added as the last element in the list of addresses:
- [550, [2087, 2086, 'f'], total_heat]
Currently, the only supported identifier is ‘f’, which indicates that the two 16-bit words read from the registers should be interpreted as a single-precision floating point number. The first address listed holds the most-significant 16-bit word and the second address holds the least-signficant word. Some devices encode floating point values using this method.
The final holding register example uses the optional fourth descriptive parameter:
- [550, 2102, temp_return, val/10]
The fourth parameter is a transform function that is applied to the holding
register value before being stored in BMON. The convention used is that
the variable val in the function holds the raw holding register value. In
this example, the transform function is val/10, so the holding register
value is divided by 10 before being stored in BMON. All Python math operators
are available, including all of the functions present in the
`math <https://docs.python.org/2/library/math.html`_ such as sin() and
log().
Collect Data from a Sensaphone IMS-4000 Monitoring System
A Sensaphone IMS-4000 is a monitoring system with the capability of supporting multiple remote units. A BMON periodic script is available that retrieves sensor values from the IMS-4000, including sensors installed on remote units. The Sensaphone must have its SNMP port accessible to the BMON server.
Below is a screenshot of an example Periodic Script configuration to read an IMS-4000:
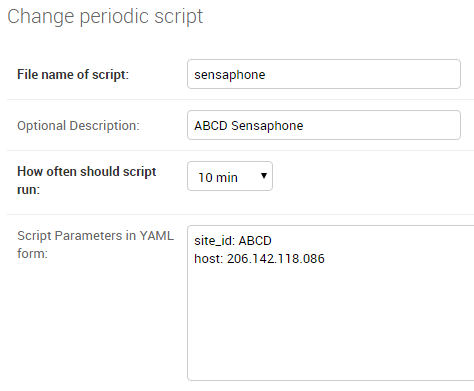
To use this script the File name of script must be sensaphone.
The Optional Description and How often should script
run entries have been previously described in this document. The rest of this
section will describe the Script Parameters in YAML form entry.
There are two required parameters:
site_id(required)The
site_idis used to create a BMON Sensor ID for each of the sensor values collected by the script. Thesite_idis used as the first part of the Sensor ID; the latter parts of the Sensor ID are formed from the Sensaphone Node name and the Sensaphone Sensor name. Each component is separated by an underscore character. In the example above, thesite_idisABCD; for a Sensaphone Node namedKianaand a Sensaphone Sensor name ofroom_temperature, the final BMON Sensor ID will beABCD_Kiana_room_temperature. Note that any spaces present in thesite_id, Sensaphone Node name, or Sensaphone Sensor name are replaced with the underscore character.host(required)The IP Address or Host name of the Sensaphone.
Collect Data from Okofen Wood Pellet Boilers
Wood pellet boilers manufactured by Okofen have a data collection system that can be accessed from the Internet. A BMON Periodic Script is available to collect data from such a boiler.
The boiler creates a daily CSV file containing one-minute resolution values of various boiler parameters. The Okofen web interface to the boiler allows you to determine which boiler parameters are collected and stored in the CSV file. Please see Okofen documentation for the process of selecting and enabling those parameters.
The rest of this section describes the process for configuring the
Periodic Script in BMON that acquires and stores the data from the
Okofen CSV files. As well as this documentation, there is also a Powerpoint Presentation
that explains the configuration process.
The screenshot below shows an example of a configured Periodic Script for collecting data from an Okofen boiler:
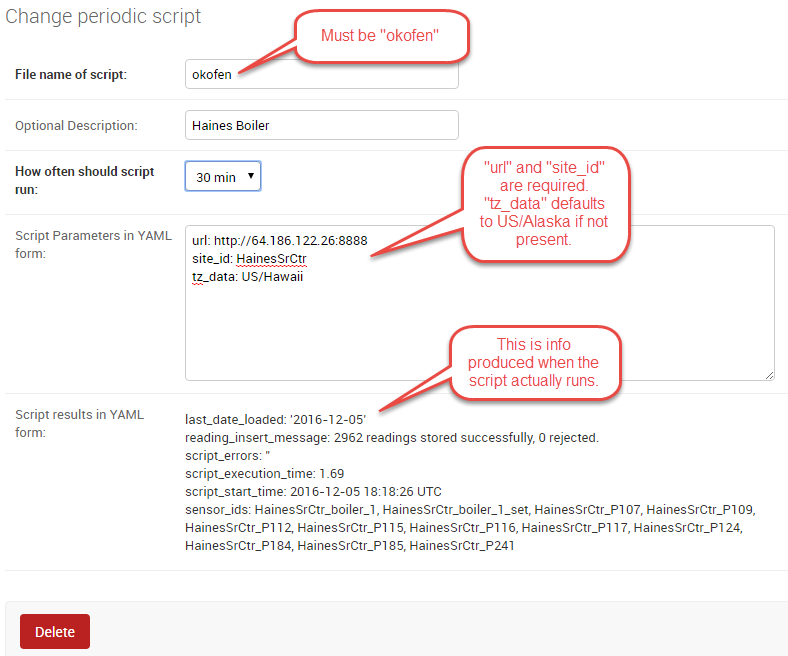
The File name of script must be okofen. The Okofen boiler
creates a new CSV file once per day, presumably shortly after Midnight.
There is little harm in allowing the BMON Periodic Script to run much
more frequently, as it simply exits if it has already downloaded the
newest file. 30 min is a good choice. If Internet access to the
boiler is unavailable for a period of time, BMON will automatically
retrieve multiple days of missed CSV files when Internet connectivity is
restored.
The Script Parameters in YAML form input can include the following
parameters:
url(required)This is the URL for accessing the Okofen boiler. The boiler access is usually on port 8888, so the URL must include this port number. Here is an example:
http://64.182.156.18:8888site_id(required)This string ID is used to create unique Sensor IDs for the values extracted from the boiler. A short descriptor of the site is best, with no spaces in the string.
tz_data(optional, defaults toUS/Alaska)The controller/data-collector in the boiler has a timezone setting that affects the timestamps of the values it records in the CSV files. The timezone may not be correctly set to the location of the boiler, for example the Hawaii timezone has been used for Alaskan boilers. Set this parameter to a timezone string found in this timezone database list.
last_date_loaded(optional, normally determined from the last run of the script)The script internally keeps track of the last CSV file it successfully loaded, and then will request files after that date in subsequent runs of the script. If the script has never been run before, the first file it attempts to load is from a day two weeks ago. This is rarely necessary, but you can override this behavior by entering in a
last_date_loadedin a form like ‘2016-11-23’. When the script next runs, it will start loading CSV files one day after that date. You might use the parameter to avoid loading two weeks of older CSV files on the initial run of the script. It is difficult to determine a case where you would want to leave this parameter for more than one run of the script, as the script internally tracks the last CSV file loaded.
The okofen Periodic Script collects all of the sensor values that
have been enabled in the Okofen boiler. Each of these sensor values is
assigned a Sensor ID by BMON. The table below gives examples of how the
Okofen sensor names are translated into BMON Sensor IDs.
The example in the table assumes that the site_id in the
Script Parameters input box was set to HainesSrCtr:
Okofen Sensor Name |
BMON Sensor ID |
|---|---|
P107 Flue/Flame temp |
HainesSrCtr_P107 |
P112 Burner Startups |
HainesSrCtr_P112 |
Boiler 1 |
HainesSrCtr_boiler_1 |
Here is the general rule. All BMON Sensor IDs start with the site_id
followed by an underbar character. Then, if the Okofen sensor name
contains a 3-digit parameter number in the form Pxxx, that parameter
number (including the leading ‘P’) is added to the BMON Sensor ID. If
there is no parameter number in the Okofen sensor name, a translated
version of the Okofen name is added to the BMON Sensor ID. The
translation converts all spaces and slashes to the underbar character,
removes all period characters, and converts all letters to lower case.
In order to see these sensors in the normal data display and analysis
portion of BMON, they must be added to the Sensors table in the BMON
Admin interface. This process is documented in the “Adding Sensors”
section of the Add Buildings and Sensors document.
There is also a special Calculated Field function available that can
create a Sensor that estimates the pellet consumption or heat output of
the boiler by examining the Status (P241 parameter number) sensor of the
boiler. See the Calculated Fields document for more details.
Collect Data from Enphase Solar PV Systems
A Periodic Script is available to collect power production data from Solar PV Systems that utilize Enphase microinverters.
Before using this script, two tasks must be completed:
A developer API key must be obtained and an Enphase application must be set up, according to the “Creating Your Account and Getting Your API Key” section on this page. This only needs to be done once.
For each Enphase system that you want to collect data from, you must obtain permission from the owner that of that system to receive the data. The process of receiving permission is described on the same web page in the “Getting Access to Enlighten Systems” section.
Here is a screenshot of a sample Periodic Script configuration that collects data from an Enphase solar system:
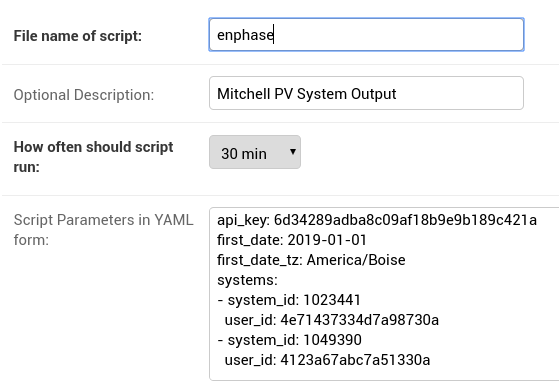
The File name of script must be enphase. The
Script Parameters in YAML form input has the following
parameters:
api_key(required)This is the API key that you obtained in the prerequisite task described above.
first_date(optional)When the script runs for the first time, you can tell it the earliest date/time of data that you want collected. Do so by filling out this parameter with a date or date/time string in any format. The Enphase API will not provide data that occurred more than one year ago, so ensure that this parameter is more recent than one year ago. After the script runs once, this parameter and the associated timezone parameter described below are deleted from the parameters box. If you don’t fill out this
first_dateparameter, the script will start acquiring data from one day prior to the script run time.first_date_tz(optional)If you provide a
first_dateparameter, you can also provide the timezone that should be used to interpret that date/time. If you do not provide a timezone the date is assumed to be in the Alaska timezone. A valid list of timezone labels can be found here.systems(required)The systems to acquire data from are listed here. The format, including indentation must be exactly as shown. Each system has two fields associated with it that are required:
system_id- the Enphase System ID for the system, anduser_idthe Enphase ID of the user that owns the system; (user_idis indented two spaces). Any number of systems can be listed. Each time the Periodic Script runs, data from each listed system will be acquired.
The script acquires the total system production with 5 minute resolution, measured in Watts. The values are measured by the microinverters and may differ somewhat from measurements done by a system production meter connected to the Enphase communication module.
For each run of the Periodic Script, the API limits collection to one day’s worth of data. The next run of the Script will pick up where it left off, acquiring any data available after the last data point collected from the prior run, subject to the one day limitation.
BMON Sensor IDs
The BMON Sensor ID for each system collected will be of the form:
enph_<user_id>_<system_id>
So, for the two systems shown in the example configuration above, the BMON Sensor IDs would be:
enph_4e71437334d7a98730a_1023441
enph_4123a67abc7a51330a_1049390
Prior to setting up the Sensors in BMON, you will see these Sensor IDs in the “Find Unassigned Sensors” report found on the “Sys Admin” menu.
Enphase API Rate Limits for Free Plan
If you signed up for the free “Watt” Enphase API Plan, your use of the API is limited to 10 API calls per minute and also limited to 10,000 API calls per month. If you only use your API key in one Periodic Script (remember that you can collect data from multiple systems with one script), BMON ensures that you will not violate the 10 calls / minute limit. However, it is up to you to configure the script run frequency in order to satisfy the 10,000 calls per month limit. Here is a formula you can use to set the frequency of the script run:
Minimum Minutes between Script Runs = 4.464 x (# of systems collected)
So, if you are collecting data from 5 systems, you need to wait at least 4.464 x 5 = 22.3 minutes between Periodic Script runs. The “30 min” choice on the “How often should script run:” drop-down will satisfy this requirement.
The only disadvantage of choosing a longer period between runs of the script will be a delay in the availability of the data in BMON. The script will collect all available data since it’s prior run (subject to the limit of 1 day’s worth of data). So, no data will be lost by running the script infrequently (up to 24 hour spacing between script runs).
Send BMON Data to an InfluxDB Time-Series Database
InfluxDB is a database optimized for storing and querying Time Series data, such as the data collected from sensors. This database is also supported as a data source for the Grafana Time Series Analytics package, which is a leading software package for creating graphical dashboards displaying time-series data. Both InfluxDB and Grafana are open source software. A BMON Periodic Script is available that will periodically send all new BMON sensor data to an InfluxDB database. An installation of Grafana can then display that data in a dashboard.
To understand the configuration of this Periodic Script, you need to have a reasonable understanding of the use of an InfluxDB database, as described on the InfluxDB documentation page.
Here is a screenshot of a sample Periodic Script configuration that sends data to an InfluxDB database:
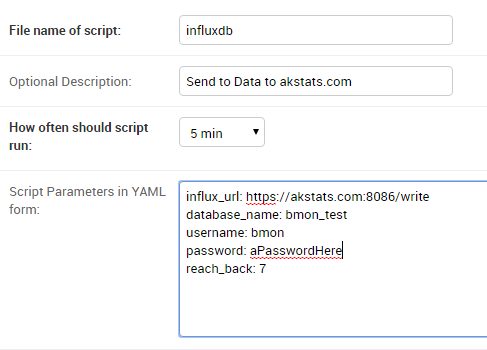
The File name of script must be influxdb. The
Script Parameters in YAML form input can include the following
parameters:
influx_url(required)This is the HTTP URL that allows writing to the InfluxDB database. If the write does not occur on the standard HTTP(s) port, then the port number should be included in the URL, as shown in this example.
database_name(required)An InfluxDB server can contain multiple databases. In this parameter, specify the name of the InfluxDB database to write the BMON sensor readings into.
username(required if InfluxDB is using authentication)The InfluxDB username to authenticate with, which must have write privileges on the target database.
password(required if InfluxDB is using authentication)The password associated with the above username.
measurement(defaults to ‘reading’)Every point in the InfluxDB database has a “measurement” type associated with it. This Periodic Script stores all of the BMON sensor readings under one measurement, which defaults to ‘reading’. However, you can change the measurement type with this parameter.
value_field(defaults to ‘value’)Every point in the InfluxDB database has one or more field values. All of the BMON sensor readings sent by the Periodic Script are stored in one field, and the default name of that field is ‘value’. That field name can be changed with this parameter.
reach_back(default = 14, measured in days)The first time the Periodic Script runs, it decides how much historical data to send to the InfluxDB database. The
reach_backparameter determines the amount of historical data sent, and it is measured in days. In subsequent runs of this Script, only new data is sent to the InfluxDB database.ignore_last_rec(default = False)If this parameter is set to True, the script will send all historical data up to the
reach_backlimit, even if the script has run before and sent that data. This can be used to repopulate a database that has been reset or cleaned of old data. This parameter should not be set to True on a continual basis, as that will cause the Script to send all historical data (up to thereach_backlimit) every time the script runs.
InfluxDB Tags Created during Export
InfluxDB allows each point in the database to be described by any number of “tags”. A tag is a key/value pair that adds metadata to the database record. An example tag would be “sensor_id=451897”, which gives the Sensor ID associated with this particular sensor reading. These tags are used to extract particular data points from the Database. Grafana knows how to build queries using these tags.
When BMON sends data to the InfluxDB database, it automatically adds a number of tags to every sensor reading sent. Below is the list of tags that are automatically created by the BMON Periodic Script. Also note that all tag values sent by BMON are all “cleaned” by replacing spaces, the equals sign, and commas with the dash/hyphen character, “-“. Further, if the replacement results in more than one dash in a row, the string of dashes is reduced to one.
building_titleThe value of this tag is the title of the Building associated with the sensor reading (as entered in the ‘Buildings’ table of the BMON Admin interface), e.g. ‘building_title=Kaluza-House’. Note that if a sensor reading is associated with more than one building, the sensor reading is sent multiple times to the InfluxDB database, once for each associated building.
latitudeThe latitude of the associated Building (again, as entered in the Building table of the BMON Admin interface).
longitudeThe longitude of the associated building.
sensor_groupThe Sensor Group chosen when the sensor was associated with the Building in BMON.
sensor_idThe Sensor ID for the sensor, as entered in the
Sensorstable in the BMON Admin interface.sensor_titleThe Sensor Title, as entered in the
Sensorstable in the BMON Admin interface.unitThe measurement unit type for the sensor, such as ‘deg-F’ or ‘kWh’.
The above tags are always included with every sensor reading point sent
to InfluxDB. In addition, you can have other tags sent with the readings
by filling in Additional Properties input boxes found in both the
Buildings BMON Admin table and in the Sensors BMON Admin table.
Any key/value pairs that you enter into these areas will also be sent
along with the readings to InfluxDB. Here is an example of two
additional properties that were entered for a particular Building:
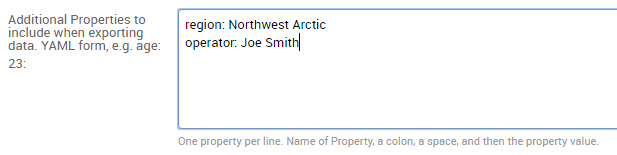
For all sensors associated with that building, these properties will be made into key/value pairs and sent as tags with the sensor readings. Tag Names will be “cleaned” by substituting the underbar “_” character for spaces and Tag Values will be “cleaned” by substituting the dash character “-” for spaces.
Also, if any of the Additional Properties for a Building or Sensor use the same Tag Name as an automatically-created Tag Name, the user-entered Tag will override the automatically-created Tag.
When creating dashboards in Grafana, all of the Tag Names and Values will automatically be displayed as choice lists when creating data queries to feed your dashboard.