How to Install BMON on a Local Web Server
This document describes how to alternatively install the BMON application on a local web server. The specific steps shown here apply to installation on a locally housed Linux server running NGINX and UWSGI. This installation process has been tested and reproduced multiple times in a test environment, however your mileage may vary. There are many ways to configure a web server, this is just a method that worked for us - install at your own risk.
The assumption here is that BMON will be installed on a server running the Linux operating system.
The skills needed for installation are primarily:
Linux command line skills - it is assumed you are familiar so explanations of basic linux command line operations are not included in this documentation.
Some experience with Python and the Django web framework would be helpful, as the BMON application is a Python application built using the Django web framework. If you are using the Wefaction hosting services, these skills are not absolutely necessary, as step-by-step installation instructions for that hosting service are detailed below. If you are not using the Webfaction hosting service, more Django and Python skills will be required, as the instructions below will need to be modified to fit your configuration.
Some knowledge of the Git version control system would be helpful.
Install and Configure the Server Operating System
Download the current LTS (long-term support) Version of Ubuntu Server from the Ubuntu Website. This documentation was written for Ubuntu Server 18.04.2 LTS.
Install the operating system on a suitable network capable physical server or virtual machine Follow the self guided installation instructions for Ubuntu, optionally installing OpenSSH for remote access.
Run updates using
sudo apt-get updateandsudo apt-get upgrade
Installing Necessary Packages
In order to run BMON on a local web server you must first install some required packages
sudo apt install build-essential checkinstallsudo apt-get install -y build-essential checkinstall libreadline-gplv2-dev python3.7 python3.7-dev libpython3.7-dev uwsgi uwsgi-src uuid-dev libcap-dev libpcre3-dev libncursesw5-dev libssl-dev libsqlite3-dev tk-dev libgdbm-dev libc6-dev libbz2-dev zlib1g-dev openssl libffi-dev python3-dev python3-setuptools wgetsudo apt-get install mysql-serversudo mysql_secure_installationcd $homesudo apt-get install python3-pipsudo -H pip3 install --upgrade pipInstalling the Virtual Environment
It is assumed we are working from within our $home directory
sudo -H pip3 install virtualenv virtualenvwrapperYou may need to run whereis virtualenvwrapper.sh and document the path.
sudo nano ~/.bashrcexport VIRTUALENVWRAPPER_PYTHON=/usr/bin/python3export WORKON_HOME=~/Envsource /usr/local/bin/virtualenvwrapper.shPYTHON=python3.7source ~/.bashrcIf the parameters added to your bashrc are correct - virtualenvwrapper scripts will be created like this:
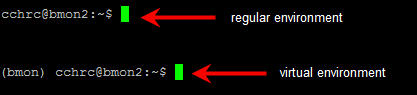
cd homemkvirtualenv bmon -p python3.7You will know you are successful if an Env directory is created within your home directory. Once you make your virtual environment, while it’s active, your prompt will change to indicate you are working in the virtual environment, below is an example of how it will look
Note
To exit your virtual environment type deactivate to resume working in your virtual environment type workon bmon for the instructions below continue working in your virtual environment until instructed to exit.
Installing the Required Python Packages & BMON Project
sudo git clone https://github.com/alanmitchell/bmon.gitA directory named bmon will be created in your $home directory
cd bmonpip3 install -r requirements.txtCreating BMON Settings File
cd bmon (you should be in bmon/bmon now)
Django requires a settings.py file to provide essential information for running a project. We will start with a sample settings file and make necessary changes.
sudo cp settings_example.py settings.pysettings.py in an editor, e.g. sudo nano settings.py. Each one of the settings is documented within the file. Examine each setting carefully for any needed changes.BMSAPP_STORE_KEY - per the settings file, visit https://bms.ahfc.us/make-store-key to generate a keyBMSAPP_TITLE_TEXT - purely cosmetic, change XYZ to the name of your organization/facility/etc.BMSAPP_HEADER - purely cosmetic, change XYZ to the name of your organization/facility/etc.ALLOWED_HOSTS - change to the server IP address or the URL depending on your setup ex. [‘172.20.127.167’] (brackets and single quotes necessary)SECRET_KEY - per the settings file, visit https://www.miniwebtool.com/django-secret-key-generator/ to generate a keyBMSAPP_STATIC_APP_NAME - indicate the full path of your project to the first level, then add static ex. /home/cchrc/bmon/staticConfiguring the Manage.py file
Unlike in the How to Install BMON on a Web Server documentation, we need to modify the manage.py file to point to the correct python location
type which python3.7 and note the path ex. /home/cchrc/Env/bmon/bin/python3.7
cd $home/bmon or cd .. if you just finished the prior step.
sudo nano manage.pywhich python, but the line must begin with#! before the path to the Python executable.sudo ./manage.py checkYou’re looking for System check identified no issues (0 silenced) If you get a permission denied error make sure your path is typed correctly in the manage.py file
Create the Django Database, Install Initial Data, and Prepare Static Files
sudo ./manage.py migratesudo ./manage.py loaddata init_data.yamlsudo ./manage.py collectstaticsudo ./manage.py createsuperuserEnter your desired username, email, and password to complete the setup. The username and password created here will be the credentials needed to log into the Admin side of the BMON site.
sudo ./manage.py runserver SERVERIP OR URL:8000Then go to SERVERIP OR URL:8000 in your web browser and see if you see a poorly formatted version of BMON (the CSS doesn’t load in development). End the test by pressing Ctl-C to kill the process
Configuring the Webserver
Note
The steps in this section are patterned after the general instructions from Digital Ocean’s How To Serve Django Applications with uWSGI and Nginx on Ubuntu 18.04
Note
We are still working in the virtualenvironment
cd $homesudo wget https://projects.unbit.it/downloads/uwsgi-latest.tar.gztar zxvf uwsgi-latest.tar.gzsudo rm -rf uwsgi-latest.tar.gzcd to the newly made uwsgi directorypython3.7 uwsgiconfig.py --buildmake PROFILE=nolangCreate the python 3.7 plugin
PYTHON=python3.7 ./uwsgi --build-plugin "plugins/python python37"Link the file
sudo ln -s /home/cchrc/[uwsgi directory]/uwsgi /usr/local/bin/uwsgiNow, end your virtual session by typing deactivate
sudo mkdir -p /etc/uwsgi/sitessudo nano /etc/uwsgi/sites/bmon.iniexample ini file
Explanation:
sudo nano /etc/systemd/system/uwsgi.serviceexample service file
ExecStartPre=/bin/bash -c 'mkdir -p /run/uwsgi; chown cchrc:www-data /run/uwsgi'where chown should indicate YOURUSERNAME:www-data
cd $home
sudo apt-get install nginxsudo nano /etc/nginx/sites-available/bmonexample bmon settings file
The only portion of this file that needs to be changed is server_name which should be changed to either your server IP address or URL and root should reflect your own directory structure.
sudo ln -s /etc/nginx/sites-available/bmon /etc/nginx/sites-enabledsudo mkdir /run/uwsgisudo chown -R cchrc:www-data /run/uwsgisudo chmod -R 774 /run/uwsgisudo chown -R cchrc:www-data /home/cchrcsudo chmod -R 774 /home/cchrc/Here, you would substitute YOURUSERNAME where cchrc is and /your/home/path where /home/cchrc is
Create an override file (this was done to fix some errors)
sudo mkdir /etc/systemd/system/nginx.service.dsudo nano /etc/systemd/system/nginx.service.d/override.confPut a space in the file and save
Change owners and permissions for the override file
sudo chmod 666 /etc/systemd/system/nginx.service.d/override.confsudo chown cchrc:www-data /etc/systemd/system/nginx.service.d/override.confsudo printf "[Service]\nExecStartPost=/bin/sleep 0.1\n" > /etc/systemd/system/nginx.service.d/override.confStart the Server
sudo systemctl daemon-reloadsudo systemctl restart nginxsudo nginx -tsudo systemctl start uwsgiTo check the status of any process type the following: sudo systemctl status SERVICENAME (ex. nginx)
You should now be able to reach your project by going to its respective domain name or IP address from your preferred web browser.
sudo uwsgi --http SERVERIP OR URL:8080 --home /home/cchrc/Env/bmon --chdir /home/cchrc/bmon -w bmon.wsgiand visiting the URL.
| reviewing the nginx error log may also help troubleshoot sudo tail -30 /var/log/nginx/error.log If you see messages about /run/uwsgi/bmon.sock failed (2: No such file or directory) while connecting to upstream it usually means you need to rerun the permission settings for the /run/uwsgi folder.
Note
change the IP address in the line above with either your server’s ip address or URL specified in your configuration
If everything works, do the following to have nginx uwsgi start automatically
sudo systemctl enable nginxsudo systemctl enable uwsgiCron Jobs
One cron job is necessary for the BMON application. To edit the your
crontab file, execute crontab -e. Then, add the following line to
the file:
*/5 * * * * cd /home/cchrc/bmon && ./manage.py runscript main_cron > /dev/null 2>&1
This cron job:
creates calculated reading values and stores Internet weather data in the reading database every half hour
checks for active Alert Conditions every five minutes
creates a daily status line in the log file indicating how many sensor readings were stored in the database during the past day (viewable by browsing to
<Domain URL>/show_log)creates a backup of the main Django database every day, and
creates a backup of the reading database every three days