How to Install BMON on a Web Server
NOTE: For an automated installation script that can install BMON on a Linux server, please see the bmon-install GitHub Project.
This document describes how to install the BMON application on a web server. The specific steps shown here apply to installation on the Webfaction Hosting Service, which has been used for most of the installations of the BMON application. The general goals of each step of the installation are also described, to assist in installation on other hosting providers or a standalone server.
The assumption here is that BMON will be installed on a server running
the Linux operating system, although installation on a Windows server is
also possible (the backup_db() method in the
bmsdata.py file uses
the gzip Linux utility, which can be installed on Windows through
use of Cygwin). The skills needed for installation are primarily:
Linux command line skills.
Some experience with Python and the Django web framework would be helpful, as the BMON application is a Python application built using the Django web framework. If you are using the Wefaction hosting services, these skills are not absolutely necessary, as step-by-step installation instructions for that hosting service are detailed below. If you are not using the Webfaction hosting service, more Django and Python skills will be required, as the instructions below will need to be modified to fit your configuration.
Some knowledge of the Git version control system would be helpful.
Create the Website and Install the Django Application
The BMON application needs to have Django 2.2.1 or greater and Python 3.7 or greater installed. On the Webfaction hosting service, Python 3.7 is already installed, so none of the steps below perform that task. If installing on a system without Python 3.7, you will first need to install Python. The rest of the steps below install Django 2.2.1 or greater, and configure the server to use Django to serve requests being made on the Domain you will use for the BMON application.
The steps in this section are patterned after the general Webfaction documentation for installing Django.
Log into the Webfaction Control Panel and click
DOMAINS/WEBSITESfrom the menu bar.Click the button
Add new website.In the
Namefield, type inbmon.It is highly recommended that an Encrypted website (https) be created, because the BMON application utilizes a password-protected log in screen for administrative access to the application. Those passwords will travel the Internet encrypted if an https site is used. Select
Encrypted website (https). You will need to install an SSL certificate in order for users to not receive a security warning when they access the site. For the Webfaction host, see their SSL documentation.In the
Domainsfield, select or type in the domain or subdomain where you want to access the BMON site. For this example, we are accessing the site on the subdomainbmon.ahfctest.webfactional.com, so we type that into the field. If your domain does not exist, you will get a prompt that will allow you to create the domain or subdomain.Click the
Add an applicationbutton and selectCreate a new application.For the
Nameof the application, usebmon_django; theApp categoryisDjango; theApp typeis a Django release of 2.2.1 or greater, paired with Python 3.7. Leave the other fields at their default values. Click theSavebutton to complete the Application setup.
Now we need to create another application to serve static files for the BMON application such as JavaScript files, stylesheets, and images. As before, click the
Add an applicationbutton and selectCreate a new application.For the
Nameof the application, usebmon_static; theApp categoryisStatic; theApp typeisStatic only (no .htaccess); enterstaticinto the URL field (for the example, the final value in that field readshttps://bmon.ahfctest.webfactional.com/static). Click theSavebutton to complete the Application setup.
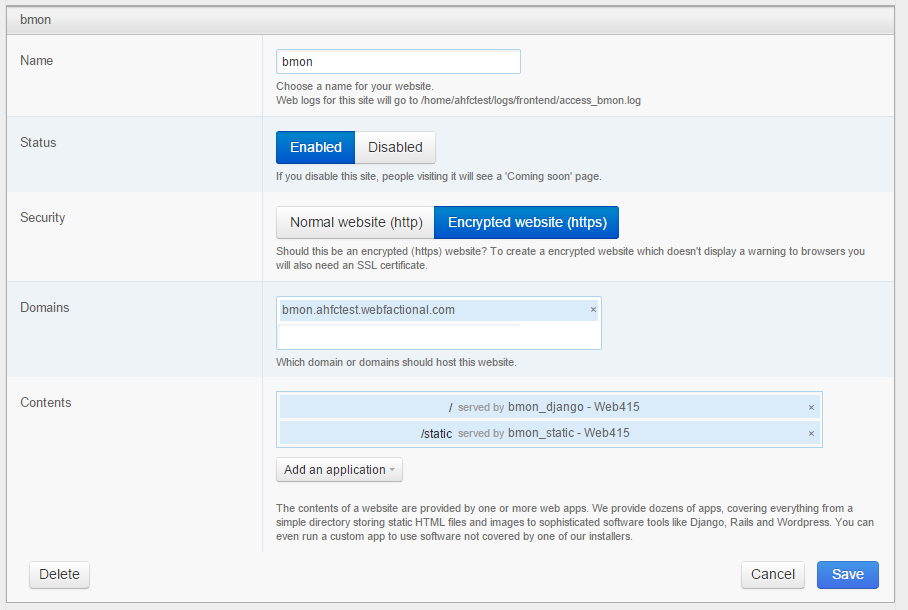
The website configuration is now complete. The website screen in this example looks like:
Click the
Savebutton on the website screen to complete the application setup.Test progress by going to your website URL (
https://bmon.ahfctest.webfactional.comin this example) and you should get an “It Worked” page in response. This may not function immediately, as some time is required for the server to process website configuration.
Set Up Email on the Web Server
The BMON application has the ability to send out notifications when
sensor values are outside of normal ranges. In order to do this, BMON
needs the ability to send emails. For the Webfaction hosting service,
email setup is described on this
page.
The minimum requirements for the BMON application are to set up one
mailbox and one email address on the Webfaction system. For example,
with a Webfaction user account name of ahfc, you could set a mailbox
with the name of ahfc and an email address of
monitoring@ahfc.webfactional.com. In a subsequent section, the
mailbox name, password, and email address will be needed for entry
in the BMON Settings File.
Installing the BMON Project
In this step, the Python code for the BMON project is installed and connected to the Django application.
Open an SSH session to the web host.
Navigate to the Django application directory by entering
cd $HOME/webapps/bmon_djangoand pressing Enter.We first need to remove the sample project that was created when we installed Django. Enter
rm -rf ./myprojectand press Enter.Clone the BMON project into this directory by executing:
git clone https://github.com/alanmitchell/bmon.git
You should now have a
bmondirectory containing the BMON software.Changes are required so that Django runs this project instead of the
myprojectproject you just removed. Execute thecd $HOME/webapps/bmon_django/apache2/confcommand to move to that directory. Then, change all the occurrences ofmyprojecttobmonin the filehttpd.confby executing the following command:sed -i "s/myproject/bmon/g" httpd.conf
Alternatively, you can use an editor to replace occurrences of
myprojectwithbmonin thehttpd.conffile.
Install Python Packages
The BMON application uses some code libraries that do not come with Python. In this section, these libraries will be installed with Python’s pip package manager using a requirements.txt file that lists the required packages.
For installing on Webfaction, first change into the BMON directory,
cd $HOME/webapps/bmon_django/bmon, and then run the following command:
pip3.7 install --user -r requirements.txt
This command can take a few minutes to complete. There is some chance the
installation process will be killed due to excessive memory usage
(probably while installing the pandas package, and you will receive
an email to that effect from Webfaction. The email will contain a link
that will take you to a Webfaction Support ticket. Inform Webfaction
that you are temporarily installing Python packages, and they will
temporarily relax the memory limit.
Creating the BMON Settings File
Django requires a settings.py file to provide essential information
for running a project. We will start with a sample settings file and
make necessary changes.
Move to the
$HOME/webapps/bmon_django/bmon/bmondirectory (yes, thebmonfolder inside thebmonfolder) and create asettings.pyfile from the sample located there:cp settings_example.py settings.py
Open
settings.pyin an editor, e.g.nano settings.py. Each one of the settings is documented within the file. Examine each setting carefully for any needed changes.Write down the BMSAPP_STORE_KEY that you created, as this will be needed when you are setting up sensors to post to the BMON system.
Create the Django Database, Install Initial Data, and Prepare Static Files
Go to the main project directory
cd $HOME/webapps/bmon_django/bmonorcd ..if you just finished the prior step.Create the Django database file by executing:
./manage.py migrate
Some initial data for common sensor units, sensor categories, and a sample building and sensor should be loaded into the database by:
./manage.py loaddata init_data.yaml
Copy the static files (images, stylesheets, JavaScript files, etc.) into the folder where they will be served by the Static Application you created. Do this by executing:
./manage.py collectstatic
In order to use the Admin site for setting up sensors and buildings, we need to create an admin user. To do this, execute:
./manage.py createsuperuser
Enter your desired username, email, and password to complete the setup. The username and password created here will be the credentials needed to log into the Admin side of the BMON site.
The final stage of the process is to restart the Apache web server. Change to Apache’s bin directory by executing
cd $HOME/webapps/bmon_django/apache2/bin. Enter./restartand press Enter. You should now be able to view the new BMON site by browsing to the Domain URL that you set up in the initial section of this installation. You should also be able to access the Admin portion of the site by browsing to<Domain URL>/admin/and logging in with the Admin user credentials setup in in step 5 of this section.If you run into any problems with your new Django application using the Webfaction hosting service, see Django Troubleshooting.
Cron Jobs
One cron job is necessary for the BMON application. To edit the your
crontab file, execute crontab -e. Then, add the following line to
the file, making changes to the path if BMON was installed in a
non-standard directory:
*/5 * * * * cd ~/webapps/bmon_django/bmon && ./manage.py runscript main_cron > /dev/null 2>&1
This cron job:
creates calculated reading values and stores Internet weather data in the reading database every half hour
checks for active Alert Conditions every five minutes
runs any Periodic Scripts that been configured in the BMON system
creates a daily status line in the log file indicating how many sensor readings were stored in the database during the past day (viewable by browsing to
<Domain URL>/show_log)creates a backup of the main Django database every day, and
creates a backup of the reading database every three days
Note that the command executed by the cron job has two parts: 1) first, it changes into the base BMON directory, and then it executes the manage.py script. This two step process is necessary on the Webfaction server because the Django Python package may only be available for scripts executed from a BMON directory.
If you choose to implement an off-server backup strategy, as described in Backing Up and Analyzing Data from the System you may have an additional cron job task.
Redirecting HTTP to HTTPS
If you want to automatically redirect users who browse to the unsecured
HTTP domain name for your site, you can set up HTTP to HTTPS
redirection. For the Webfaction hosting service, this process is
described on this
page.
However, it is important to modify the .htaccess lines to the
following:
RewriteEngine On
RewriteCond %{HTTP:X-Forwarded-SSL} !on
RewriteRule ^(.*)$ https://%{HTTP_HOST}%{REQUEST_URI} [R=301,NE,L]
The NE parameter on the last line ensures that the redirection does
not distort certain query strings that may appear in the URLs.
Time Savers
It is useful, but optional, to define a couple aliases in your
.bashrc file located in the home directory. These will allow for
quick navigation to the BMON application directory and easy restarting
of the Django application:
alias cddj='cd ~/webapps/bmon_django/bmon'
alias rsdj='~/webapps/bmon_django/apache2/bin/restart'
Steps for Upgrading the BMON Software
Developers are frequently upgrading the BMON software on its main GitHub repository. In order to update your installation to the latest version, follow these steps:
Open an SSH shell session to the server.
Stop the Django application by navigating to the Apache bin directory,
/home/<username>/webapps/bmon_django/apache2/binand then executing the command./stop.Move to the
$HOME/webapps/bmon_django/bmonproject directory (or use thecddjalias if you defined one in your.bashrcfile.)Execute a
git pullcommand to update your local copy of the BMON software to the most recent version.Copy all the static files of the application to the folder where they are served from. Do this by executing the command
./manage.py collectstatic.Perform any database modifications required by the upgrade by executing
./manage.py migrate.Review the
bmon/settings_example.pyfile to see if there are any new settings that are not present in your currentbmon/settings.pyfile (settings.pyis not in version control). You do not need to look beyond the line:# ------- Generally shouldn't need to change anything beyond here -------If there are new settings required, edit your
bmon/settings.pyfile to include the new settings with appropriate values.Restart the Django application by navigating to the Apache bin directory,
/home/<username>/webapps/bmon_django/apache2/binand then executing the command./start.Note that there is a shell script that performs these upgrade tasks and restarts the server. The script is
update.shand is located in the root BMON directory:$HOME/webapps/bmon_django/bmon. If you need to edit values in thesettings.pyfile, then you should use the manual upgrade steps to avoid the restart of the server that will occur with the shell script.
Maintaining the Sensor Reading Database
The sensor readings posted to the BMON system are stored in a SQLite
database dedicated to that purpose. For information on the structure and
location of that database, see Backing Up and Analyzing Data from the System. Occasionally,
maintenance operations, outlier removal, data archival and other
database tasks need to be performed. One approach is to open a secure
shell connection (SSH) to the web server and use the sqlite3 command
line tool to manipulate the database. Alternatively, a web-based
database administration tool can be installed onto the server, so that
manual database operations can be performed through a web interface. One
such tool is phpLiteAdmin.
The tool allows viewing the sensor data, executing SQL statements, and
exporting sensor reading tables. Installation of the tool is
straight-forward and documented on the web page link above. When using
the Webfaction hosting service, installation of the Static/CGI/PHP
application is required to run the phpLiteAdmin tool, as this tool is a
PHP web application.
Next Step: Add Buildings and Sensors
The next step for configuring the BMON system is to use the Admin
interface available at <Domain URL>/admin/ to enter buildings and
sensors into the system. See the Adding Buildings and Sensors
document for further explanation.